It's no secret that most shared hosting platforms are just terrible. This includes HostGator, BlueHost, and any other you can think of. The only true way to have a solid web host is to build it yourself. It's not too complicated either, and I like two cloud hosting companies, Linode and Digital Ocean.
Our company used Linode (running a LEMP setup) for all our client sites in the early days, and we couldn't be happier about how it helped Zadro Web grow. I also created a complete LEMP WordPress setup tutorial if that's your preferred configuration. Today, we use a combination of on-premises and cloud architecture.
So, why have a quick start tutorial for Digital Ocean and LAMP if we use LEMP?
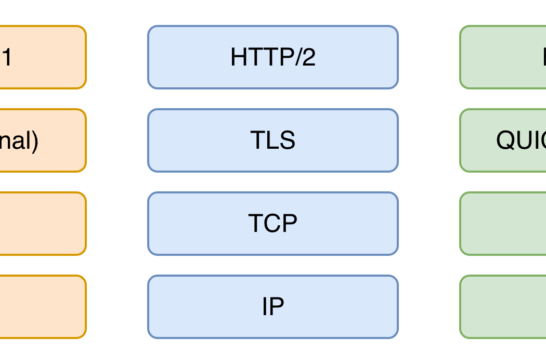
If you're unfamiliar with LEMP, it uses Nginx (pronounced Engine-x) instead of Apache for the webserver. You will (typically) have fewer setup issues running WordPress or other CMS platforms on Apache.
Also, with Linode, you can bind many IPs to a single installation. In contrast, with Digital Ocean, you're assigned a single IP per droplet -- a droplet is their naming convention for a single VPS (virtual private server).
If you need the flexibility to host multiple IPs, go with Linode and take the time to learn Nginx.
Digital Ocean is the clear choice for a single VPS installation, and that's the reason for this LAMP tutorial.
Ok, here we go...
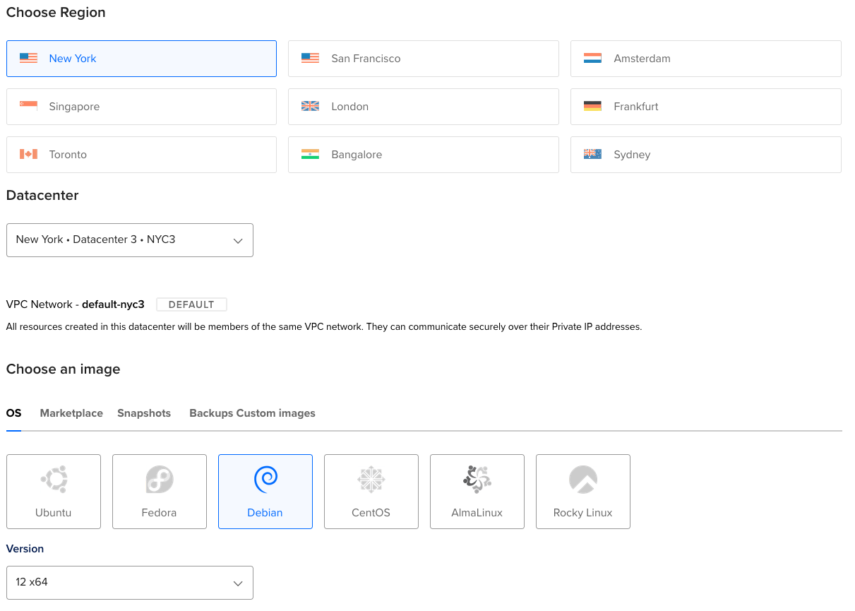
- Head over to Digital Ocean and sign up (yes, that's a referral link). Create a new $5/month "droplet" and choose Debian 12 - you will be emailed the "root" password and IP of your new server (droplet). Why Debian? Because it's clean and simple. If you need Cpanel, then this guide is not for you. We're creating a server requiring command line administration from a terminal window moving forward. Plus, you can take a snapshot of your server and make as many "clone" droplets as you like later, 1 for each site.
- After you receive your root password and IP, open up a terminal window, type
ssh root@123.123.123.123, and replace it with your provided IP address. Next, let's start by getting some basic security for your new server. - Change the root password right away by typing
passwdonce logged in. Choose your favorite password creation tool and make sure it's highly secure with upper, lower, punctuation, and 16 characters should be good. - Next, we will add a new user that you will use to access your server over SSH for all future sessions - we will be disabling SSH access for root in a bit. Type
adduser zeusto create a new user with the username zeus. Choose whatever username you want; it should be hard to associate with your website. Choose a secure password. - Now, create a new group that will be used for SSH by typing
groupadd sshusersso that you can add any additional usernames directly to this group for SSH access down the road. The group name "sshusers" can be whatever you want, just like the username, but update #6 and #7 below also. - Let's add zeus to this new group by typing
gpasswd -a zeus sshusers - We're going to edit the sshd_config file that is used to access the server over SSH by typing
nano /etc/ssh/sshd_config- Look for
PermitRootLogin yesand change toPermitRootLogin no- this will disable root login from using SSH. - Look for
PasswordAuthentication noand change toPasswordAuthentication yes-- if you're comfortable setting up SSH keys, you can come back and change this back to "no" later once you have your keys set up properly. - At the end of the file, add
AllowGroups sshusers-- this is the group you created above. - Type
service ssh restartso that all our new settings for SSH take effect. To access your server in the future, you must typessh zeus@123.123.123.123(replacing the IP with the one Digital Ocean provides or your hostname and replacing zeus with your chosen username). Then, you can typesuat the command prompt to become root to make server modifications.
- Look for
- You'll get a lot of script kiddies knocking on your SSH door, so I like to update the following files so that I don't worry about these attacks. This step assumes you have a static IP at your office or home location. If you have a standard home internet provider, move to step #9. You can also read about SSH throttling to minimize attacks even further. Let's edit some files...
nano /etc/hosts.denyand addsshd: ALLto the end of the file - this file is read first and prevents all SSH access.nano /etc/hosts.allowand addsshd: 100.100.100.100to the end, where you will be replacing this IP with your static office IP to allow access. Again, only do this if you have a static IP from your ISP.
- Let's get a simple firewall installed. Type
apt-get install ufwto install Uncomplicated Firewall - great resource here for more details. Now, some basic rules:- Type
ufw allow sshto access the server. - Type
ufw allow wwwfor web traffic. - Type
ufw allow httpsif you plan on installing SSL on your site later. - Finally, type
ufw enableto turn the firewall on.
- Type
- To install Apache, type
apt-get install apache2at the command prompt. - For MySql, type
apt-get install mysql-serverand it will then give you the option to choose a "root" password for your database server. Again, keep this password secure, and make it different than your server's root password. - Finally, to install PHP type
apt-get install libapache2-mod-php8.3 php8.3-mysql php8.3-dev php8.3-curl php8.3-gd php8.3-imagick php8.3-mcrypt php8.3-memcache php8.3-common php8.3-pspell php8.3-snmp php8.3-sqlite php8.3-xmlrpc php8.3-xslto setup PHP with the most common extensions. I think that's everything required for most CMS platforms. - You will probably want
mod_rewriteon your LAMP server, so typea2enmod rewriteat the command prompt. - If you plan on using SSL, you can type
a2enmod sslthena2ensite default-sslat the command prompt. You will need to modify /etc/apache2/sites-available/default-ssl with the proper paths to your private and certificate key files. This step is not necessary if you do not plan on using SSL. - Let's type
cd /home/zeusand thenmkdir wwwto create a working directory for your new site. Let's typechown zeus:zeus /home/zeus/wwwfor good measure. - Now, type
nano /etc/apache2/sites-available/defaultand change /var/www to /home/zeus/www in those couple of spots. Do the same fornano /etc/apache2/sites-available/default-sslif you configured step #14. - We need to add www-data to our user so our web server runs properly using
gpasswd -a www-data zeus - And last, you want to restart apache by typing
service apache2 restartat the command prompt. You can addServerName yourdomain.comto /etc/apache2/apache2.conf to stop the warning message on restart, replacing yourdomain.com with the domain you used to setup the server prior to step #1.
There you have it, 18 quick steps to get a very basic production-ready LAMP server. To upload your site, you can use any FTP client and choose SFTP as the connection method, then enter the username and password you created in step #4 above.
You will probably want to fine-tune the OPcache settings in your php.ini file and server further, but this guide will get you started.
As bonus steps, run apt-get install postfix after you log in to your terminal and ufw enable smtp -- both of these commands will get your outbound SMTP to work properly for any contact forms on your site. You can later fine-tune your Postfix mail server, but the first step will do almost all you need.
If you don't have a static IP at your home or business, you will want to use Shorewall combined with Fail2Ban for your firewall configuration (outside the scope of this article). To access your MySql databases, get in the habit of using MySql Workbench over an SSH connection.
Feel free to ask any questions or provide feedback by reaching out using the contact form.