I love VPS servers. Configuring them and customizing cloud solutions brings me joy.
For the last seven years or so, we have hosted all our clients on Linode, and they're great. Their support is lightning-fast and top-notch. They had some outages, though, in their earlier years that hit hard.
Regardless, they've been a solid choice, and I'm proud to have been their customer for so long. Before SNI, we needed a provider that could bind multiple IPs to one host, and Linode was the best solution...back then.
Fast forward to today. We now host our clients on a powerful bare-metal box with RAID configurations, using a virtual machine running VMWare.
There's a pretty good-sized fiber connection as well. We have full control of our client's data, run local backups, can spin up new VMs anytime, and much more. It gives our clients a powerhouse server, and keeps costs way down!
However, if our building power were to go down, so would our clients' websites. The building has backup power, but that would still be a disaster, and we needed a fail-over solution.
After considering the many cloud providers we've used, I have decided that Digital Ocean is a great fit.
Their interface is clean and fantastic, with a continually growing set of solutions. I've built out many custom solutions for various clients in the past across all cloud providers (AWS, Azure, Google), and DO is by far the easiest.
Plus, the cost is right. The other option I was thinking of was to build out an auto-scaling solution in Azure or AWS; it's unnecessary at this time.
Digital Ocean Setup Quick Summary
This post is not going to cover the fail-over solution, sorry.
Instead, I'm going to go over the basics of building a fresh Debian LEMP server all the way through to a full working Nginx setup to run WordPress. If you're into Apache instead, I've written a quick-start guide on setting up a LAMP server before (it's a little dated but should still apply).
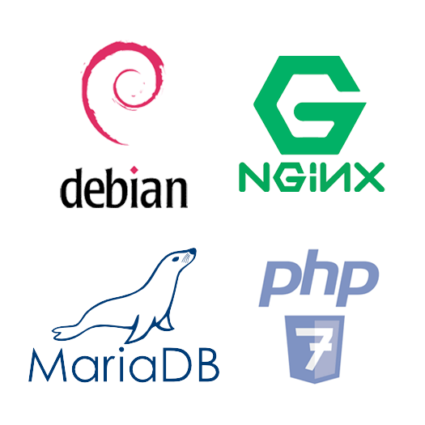
In case you're not sure what LEMP stands for, it's Linux, Nginx (pronounced Engine-x), MariaDB (or MySQL), and PHP.
Creating Your LEMP Server
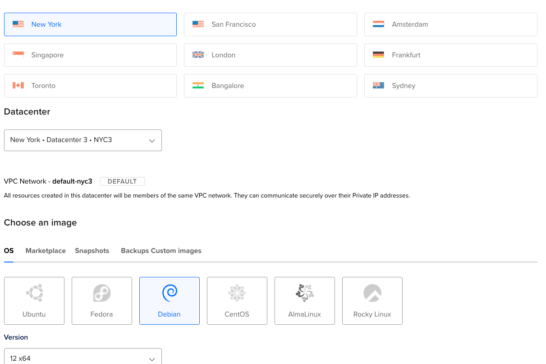
Ok, let's get started with the Linux part and install our preferred distribution. Create an account on Digital Ocean (Free $200 Credit), and log in to create your first Droplet.
Next, choose the latest version of Debian 12 as your image. You could also continue through this tutorial if you want Ubuntu.
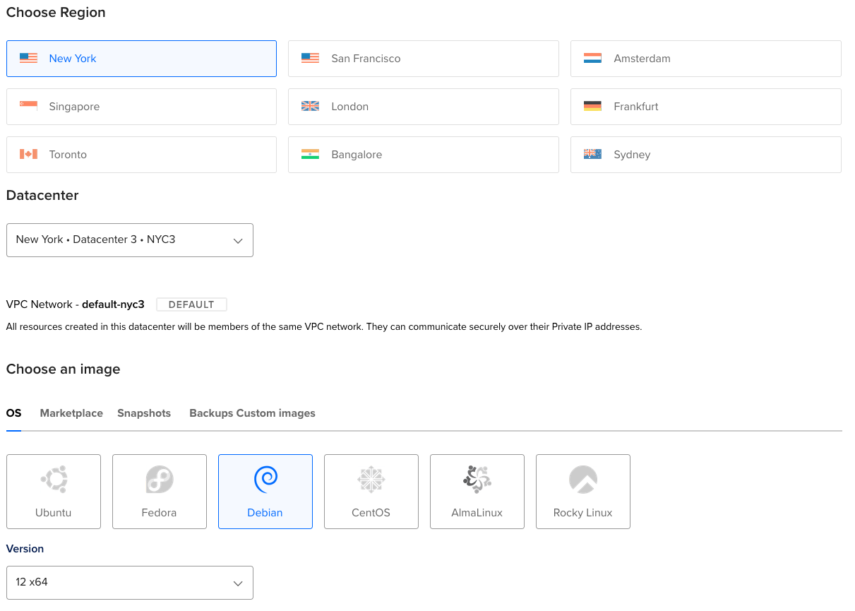
Next, choose the size of your Droplet. You can skip the Backups and Block Storage section for now. You can always add these later. Since this will act as a secondary server, I don't need either of those solutions.
Choose your Datacenter that best matches where your customers are geographically. A server near your primary visitors means lower latency, and that's what you want.
Next, you have some Additional Options to choose from:
Let's talk through these. First off, you can always enable the options later, and they're all free. I chose the Monitoring option to see some extended metrics in my dashboard and to be able to create alerts. If you're creating a mail server, IPv6 would be a good idea for better email delivery, especially to Gmail servers. Anyway, you can read more about the additional options on Digital Ocean.
Next, we're going to skip setting up the SSH key here. It's just personal preference, but I don't want my keys anywhere but with me. We'll still lock down SSH and create keys in a bit.
Okay, update your hostname, then hit the big Create button, and in a few seconds, you'll have a new server with your IP. You will receive an email shortly after with your "root" password.
Before we access our new server, let's create some firewall rules in the Networking section of Digital Ocean. This is another great feature.
Before, we needed to use something like UFW or Shorewall. Their network-based firewall is all you need in most cases, and stopping threats before reaching your server is the best option. Here are the rules you need to create for a standard web server:
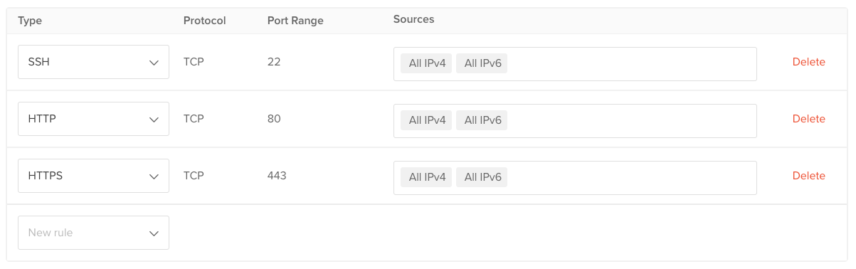
Make sure you click the "Droplets" tab to add your new Droplet and apply the rules you just created.
Basic VPS Server Setup
Finally, let's access your server. Open up a terminal window on your Mac, or use PuTTY on your PC. My instructions are going to be Mac-focused throughout this tutorial.
You're going to SSH over the default port 22 and simply type from the terminal window:
ssh root@111.222.333.444Obviously, replacing your newly supplied IP in place of the one above. It will prompt you to change your password, and you're in!
You should also create a new A record at your DNS provider to point your hostname to your new IP. Then, you can replace the IP with your hostname next time you log in to your server.
Then, I always run a few commands with any new server.
apt update && apt upgradeapt install software-properties-common build-essential htop ntp wget curl mailutils apt-transport-https lsb-release ca-certificatesThe first line updates our package lists found in /etc/apt/sources.list and /etc/apt/sources.list.d/ and then upgrades all packages.
And I just like htop as a better visual tool for checking server resources. You can run htop at the command line once installed to see how that looks.
Let's now configure our Network Time Protocol (NTP) server and timezone.
nano /etc/ntpsec/ntp.confUncomment the "server" line and change the value to us.pool.ntp.org for the server name.
Then run:
dpkg-reconfigure tzdataFollow the on-screen prompts to select your correct timezone settings using the up/down keyboard arrows.
Locking Down SSH
Before we lock SSH down, there are some things you need to consider. Will you be the only one accessing your server, or will you provide access to developers, clients, or others? Do you have a dedicated IP that you work from? I will cover some basic security and additional details at the end.
We're definitely going to lock down the ability for "root" to access your server over SSH. In order to do that, we first need to create a new user, which is simple:
adduser user

adduser user sudo
The username above is user -- replace with your desired username. Enter a strong 20+ character password. The next line adds the new user to the sudo group. Moving forward, you can run root commands as this user.
I've been using this password generator tool for years, in case you need one.
Also, Digital Ocean creates a user debian, which could pose a security risk (kind of like having a default user on your router - not good). Let's remove this user.
groupdel debian

userdel -rf debian
Now, Let's type exit at the terminal and terminate our SSH session. We're going to create a new SSH key for this user from your Mac!
Again, with a new terminal window...from your Mac command line...type the following:
ssh-keygen -b 4096It will prompt you for the file location. I would like to change the file name to match the server since I have multiple SSH keys for various servers. Follow the example given and change the last part id_rsa to any new name. I always add a passphrase as well; it's up to you.
Now, we will push the public key to your server and log in as the new user you created above with adduser.
ssh-copy-id -i your_public_key.pub user@hostIt will prompt for the password you created for your new user. That's it! Now, you can access your server using your SSH key pair.
Next time you type login to your server, you can simply type:
ssh user@hostReplace host with your IP or updated DNS record.
If you entered a passphrase, that's all you'll have to remember, not your highly secure 20+ character password.
Let's log back in as root to finish securing SSH. Replace the IP address below with the one assigned to you.
ssh root@111.222.333.444

groupadd sshusers

gpasswd -a user sshusers
Replace user above with the username you created at the beginning of this section. We're creating a new group called sshusers and adding user to that group. Only users added to this group will be allowed SSH access.
cd /etc/ssh

nano sshd_config
You can update the SSH port, but I never do. Any decent security scan, such as nmap will find the exposed port anyway.
Uncomment the 3 lines starting with HostKey by removing the # sign at the beginning.
Find PermitRootLogin and change the yes to no.
Then go all the way to the bottom and add this line:
AllowGroups sshusersUse ctrl + x, then type "y" then type "enter" to save and close the file.
service sshd restartThat's a very basic lockdown. You can take it further by locking SSH down to only your IP by modifying /etc/hosts.allow and /etc/hosts.deny through researching that on your own.
Now, type exit and enter as many times as possible until you're back at your own computer's command prompt. Once again, type ssh user@host or ssh user@111.222.333.444 (replacing user either host or IP with your settings).
You should go directly in without having to type a password unless you added a challenge phrase.
Installing MariaDB
The latest version of Debian 9 is called Stretch. It now ships with MariaDB instead of MySQL. MariaDB is fully backward-compatible and has many new features you can read about. You can still run phpMyAdmin with MariaDB, so all is good there.
apt-get install mariadb-server

mysql_secure_installation
The first line will install MariaDB and all package dependencies. Then, we'll run the next line to set the database root password. During the prompts, type "y" for all questions to secure the installation and remove unnecessary users and tables.
**** make sure to save your database root password ****
Let's log in to MariaDB (mysql) and create a database while we're here that we'll use to complete the WordPress setup later.
mysql -u root -pEnter your MySQL root password. You'll see a MariaDB prompt, then enter:
create database <strong>wpdb</strong>;
create user <strong>wp_user</strong>@localhost;
SET PASSWORD FOR '<strong>wp_user</strong>'@localhost= PASSWORD('your_password_here');
GRANT ALL PRIVILEGES ON <strong>wpdb</strong>.* TO <strong>wp_user</strong>@localhost IDENTIFIED BY 'your_password_here';
You can change wpdb and wp_user to anything that might suit you better above.
You will want to tune your MariaDB/MySQL installation. Start with navigating to /etc/mysql to get familiar with the configuration structure. If interested, I can do a separate guide on database tuning. However, for a single WordPress site, it's ready to go.
We'll come back to the database after completing the Nginx setup.
Installing Nginx
You're probably familiar with Apache as the web server, and it's a powerhouse. It's the typical setup on shared hosting providers and has some advantages.
If you're in the SEO space, you know about the .htaccess file to build things like 301 redirects, among the many other configuration files. However, these config files can cause security issues and speed bottlenecks.
Nginx was originally built to process a massive amount of concurrent connections. The resource usage (memory, CPU, etc.) is highly optimized. When it first came out, many used Nginx on the front end as a "reverse proxy," with Apache processing requests on the back end. It was a clumsy setup, and Apache's no longer needed.
With Nginx, you can use it as a reverse proxy, a load balancer, and so much more. It's incredible! Okay, let's get into the install.
If you would like to install the Debian shipped version, simply run the following:
apt install nginxClick "Y" to install all the dependencies. If there are no errors during package installation, you can visit http://111.222.333.444 (your IP address) or the DNS name you associated with your IP to see a default Nginx welcome screen.
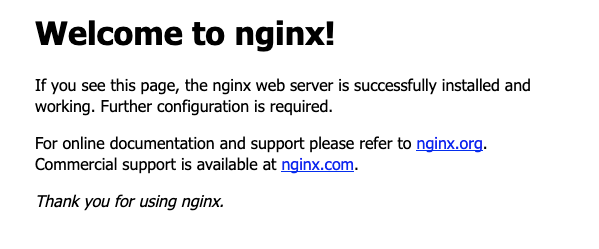
You now have a working webserver! However, it still will not be able to process PHP. We'll get into that next.
Keep in mind this is a bare-bones install. I won't cover how to "tune" your Nginx settings in this article. I might cover that topic in a future article.
Installing Ngnix from Source
Debian 12 (Bookworm) ships with Nginx version 1.22, which is good for most purposes. However, the latest stable version of Nginx is 1.24, has some significant release updates and bug fixes, and the TLSv1.3 protocol is enabled by default.
You can skip the next commands below and continue to the Setting up PHP section.
However, if you prefer to have the most recent stable version, let's get the signing key first:
curl https://nginx.org/keys/nginx_signing.key | gpg --dearmor -o /etc/apt/trusted.gpg.d/nginx-key.gpg
Next, let's get our repository updated:
sh -c 'echo "deb http://nginx.org/packages/debian/ $(lsb_release -sc) nginx" > /etc/apt/sources.list.d/nginx.list'Now, you're ready to install Nginx:
apt update

apt install nginx
However, some unstable dependencies still exist, so use the about instructions at your own risk.
Setting up PHP 8.2
At the time of this writing, the latest stable and supported version of PHP is 8.2, which you can read about here.
Let's install the latest version, but it will require adding new repos first:
wget -O /etc/apt/trusted.gpg.d/php.gpg https://packages.sury.org/php/apt.gpg

sh -c 'echo "deb https://packages.sury.org/php/ $(lsb_release -sc) main" > /etc/apt/sources.list.d/php.list'

apt update
That last line above is important to update all the repositories. Now, we can install the common PHP 8.2 packages (plus some others that will be useful).
apt install php8.2-cli php8.2-common php8.2-curl php8.2-dev php8.2-fpm php8.2-gd php8.2-gmp php8.2-igbinary php8.2-mbstring php8.2-memcached php8.2-msgpack php8.2-mysql php8.2-opcache php8.2-readline php8.2-soap php8.2-tidy php8.2-xml php8.2-xsl php8.2-zipJust hit "y" on the prompt, and PHP should now be installed. You can check by typing php -v at the command line.
Okay, now we have Nginx and PHP installed, but we still can't run any PHP files through Nginx. This requires more configuration.
Setting Up Nginx with PHP
Nginx has a default configuration file with lines you can un-comment for PHP to work. You can find the file here: /etc/nginx/sites-enabled/default
If you un-comment the location PHP location block and update php7.4-fpm.sock to php8.2-fpm.sock, you'll have a working Nginx setup, ready to process PHP.
It should look like this:
location ~ \.php$ {
 include snippets/fastcgi-php.conf;

 # With php-fpm (or other unix sockets):
 fastcgi_pass unix:/var/run/php/php8.2-fpm.sock;
 # With php-cgi (or other tcp sockets):
 #fastcgi_pass 127.0.0.1:9000;
}
Notice there are 2 different fastcgi_pass parameters. You can only uncomment one, and I prefer using the unix socket vs. the TCP socket. You can later create separate PHP pools if you host multiple websites.
Next, reload nginx:
service nginx reloadNow, navigate back to /var/www/html and create a file called info.php with the following code:
<?php

phpinfo();

?>
You can do that by simply typing nano info.php and copy/paste the code into the file. Then use ctrl + x, then type "y", then type "enter" to save and close the file.
Next, you will need to restart nginx using: service nginx restart
Let's test it.
Navigate to your IP address and check the info file with something like http://111.222.333.444/info.php
Hopefully, it all went well, you will see this page:
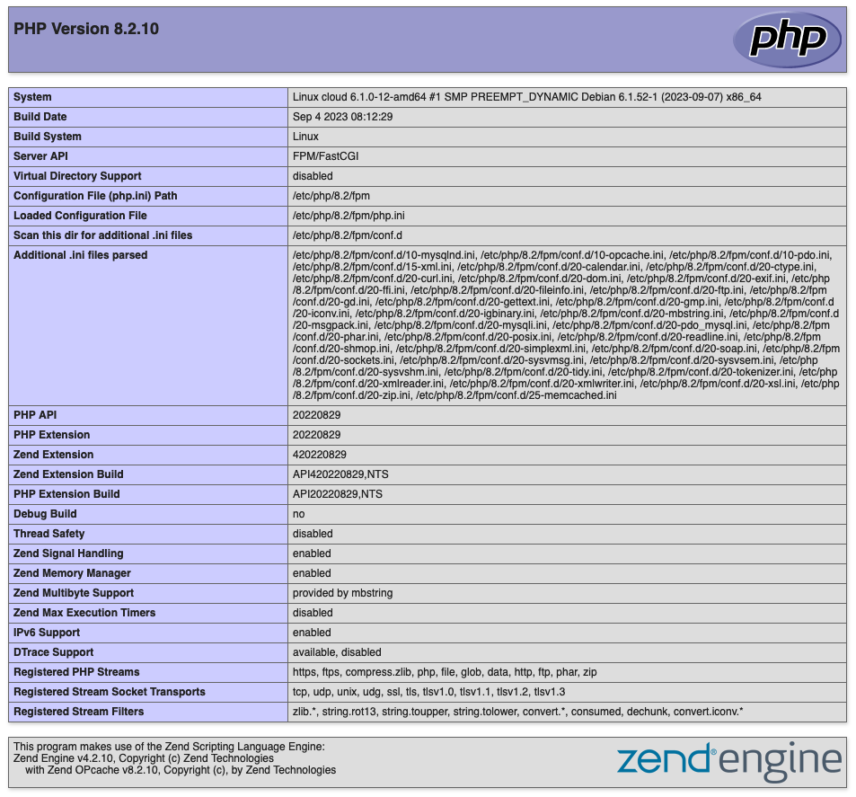
Hey, look at that! You now have a fully working version of LEMP!
Setting Up WordPress
So, now you should still be in the /var/www/html folder.
Remove a couple of files by typing:
rm info.php index.nginx-debian.htmlNext, let's download and uncompress WordPress. Again, you want to be in the /var/www/html folder and can type cd /var/www/html if you're not there already.
apt-get install wget

wget https://wordpress.org/latest.tar.gz

tar --strip-components=1 -xvf latest.tar.gz

rm latest.tar.gz

chown www-data:www-data -R *

mv wp-config-sample.php wp-config.php
After you complete those steps, open a browser window, and let's get random salt and keys.
Copy all 8 lines, then once again use nano to edit the wp-config.php file:
nano wp-config.phpFind the section that shows the salt and keys, and replace it with the 8 lines you copied.
Ok, now look up towards the beginning of the file. We need to update the database information from the MariaDB setup from earlier.
Update these three lines:
define( 'DB_NAME', 'wpdb' );

define( 'DB_USER', 'wp_user' );

define( 'DB_PASSWORD', 'your_password_here' );
Same as before, ctrl + x, then type "y", then type "enter" to save and close the file.
We're done! Now navigate to your IP or domain name, and you should see the WordPress install screen like below.
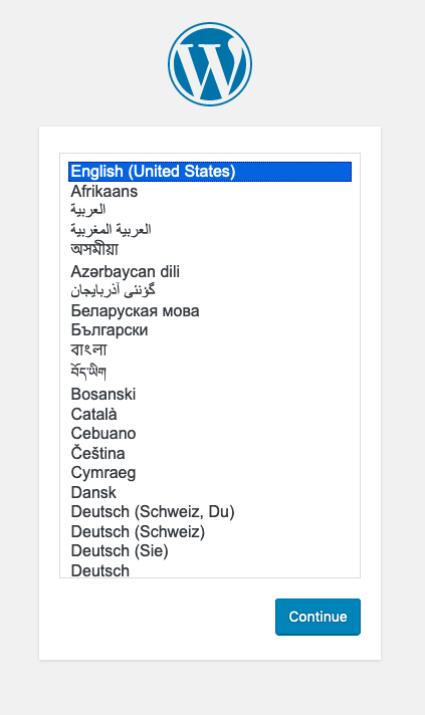
Just follow the prompts, and you will have a fully working version of WordPress ready to go.
In Summary
Creating your virtual private server (VPS) is an amazing way to control your web server environment. I wouldn't have it any other way. You can do much more on your server, like adding ClamAV for basic file protection and enhancing Nginx with Let's Encrypt SSL and modules such as Brotli, PageSpeed, and many more.
Remember, this is an incredibly basic Linux server guide to get your VPS up and running with WordPress. However, there are more setup tasks, such as testing mail flow, setting up SSL, and tuning your entire server.
If you would like a custom solution for your site or business, or interested to explore our managed web hosting, please open a discussion by completing our contact form.