Google Tag Manager (GTM) is quickly becoming the go-to solution for all digital marketing agencies and teams. Quite honestly, it's awesome and you should already be using it!
GTM lets you add custom HTML tags and other "pixels" without touching the source code of your website. This is true for most basic implementations.
The new version 2 interface of GTM makes using this seamless solution even easier. This guide is going to help with the initial setup of GTM. If you have tag manager already set up with Google Analytics, some of this will be a nice review.
Also, I wrote a post a while back on SEMRush that dives into the SEO benefits of GTM. Check that out after completing this guide, as it has some great search engine optimization tips.
The purpose of this tutorial is to help you set up "event tracking" with GTM. Let's get started!
How Event Tracking Collects Data
With Google Analytics (GA), you can take advantage of "events" with your website data. What are events?
In the most simple explanation, events are a way to collect data about visitor behavior with your website content and various web page elements. Configuring "events" in GTM can be intimidating, and I hope to help clear some confusion.
There are many cases where you would want to collect data on how a visitor interacts with your website. The most common interaction is "click" behavior, and using event tracking is the perfect way to collect these metrics.
Configuring GTM with events will require you to modify your website's source code. However, since this is an intermediate to an advanced topic, basic HTML should be something you're already familiar with.
The Data Layer
As brilliantly discussed by Sumo Ahava, the Data Layer is a data structure that holds all data you want to process from your website to another application. More specifically, it's a JavaScript array that holds data in key-value pairs.
Moving forward, I will refer to this array object as dataLayer for simplicity.
We will configure a "container" in GTM that will hold "tags", and the dataLayer is how your website will communicate with this container. More on this in a bit.
To create the dataLayer for processing events, you will need to add the following code just before the closing </head> element on your website:
<script type="text/javascript">
dataLayer = [];
</script>
Now, the "events" will be collected properly, and we can move over to Google Tag Manager to configure the container and associated tags.
Setting up GTM
Ok, let's finally head over to Google Tag Manager and create a new account and container. It's very straightforward, as you can see from the image.
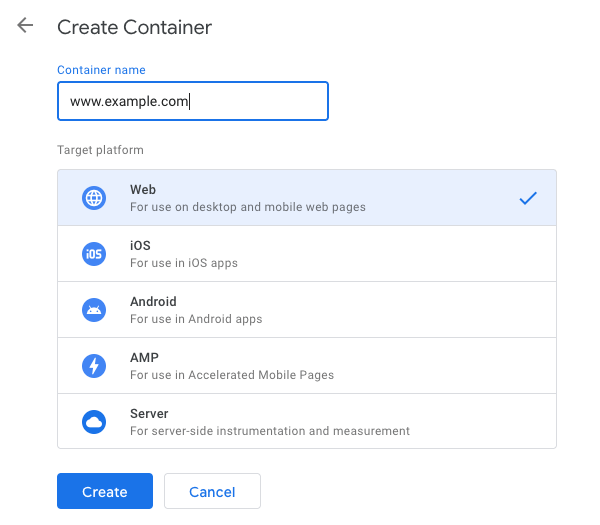
Make sure you choose the "web" option for the container and click create. You will then see and need to accept Google's terms. After that, you will receive the installation code.
Copy and paste the provided code before the closing </head> element again on your website, but make sure this goes before the small dataLayer script we added in the previous step. This is a very important step.
Deploying Google Analytics
If you're not currently using GTM for Google Analytics, now's the time to switch. Creating a new tag is simple. You will need your tracking ID from GA to create your first tag.
If you already have GTM setup for GA, then skip down to Creating the Event Tag.
The analytics tracking ID is the familiar-looking UA-123456789-1 number, and you can simply copy it from your GA interface.
Log into Google Analytics and go to Admin → Property → Property Settings or in Admin → Tracking Info → Tracking Code to get your tracking ID.
Click the "add a new tag" link from the overview tab on your new GTM container. Next, you will select Google Analytics: Universal Analytics.
Enter a tag name, then create a new variable and enter your GA tracking ID, then select the checkbox to enable display features (optional).

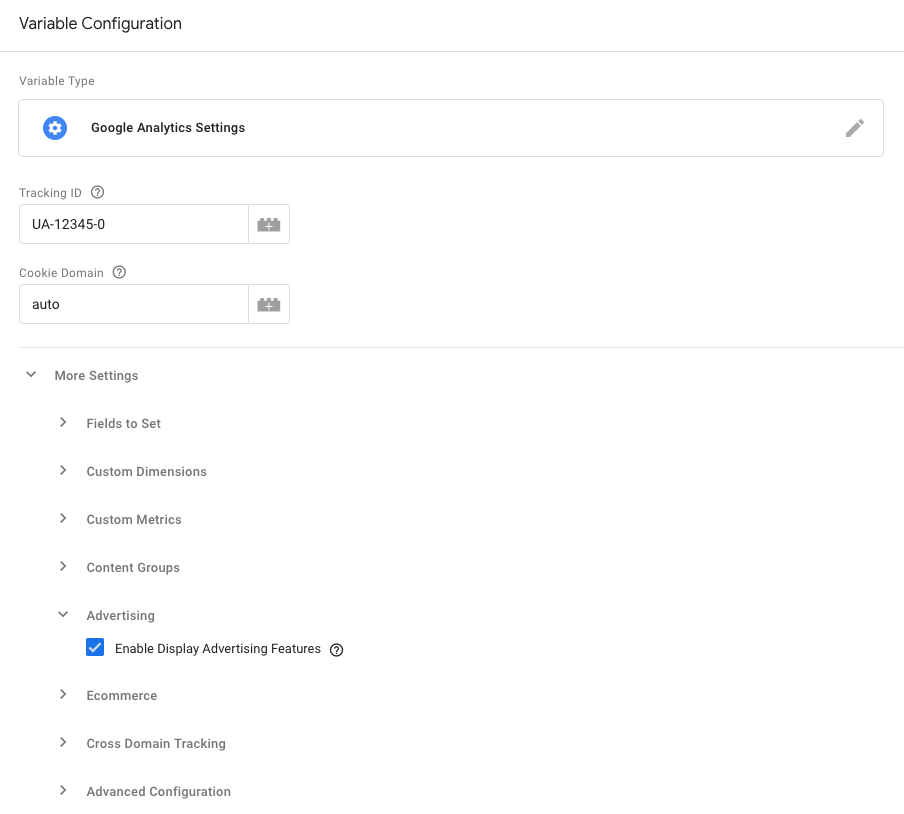
The Track Type should be Page View. Now, click continue, and make sure to create a trigger and set it to All Pages.
For more detailed instructions on deploying Google Analytics via GTM, you can view the official Google Help page.
Creating the Event Trigger
Ok, so now we're ready to create the event tag that will be used to collect data in Google Analytics.
But first, we need to set up a "Trigger" for our tag to fire on. Navigate to Triggers in the left menu, and create a new trigger.
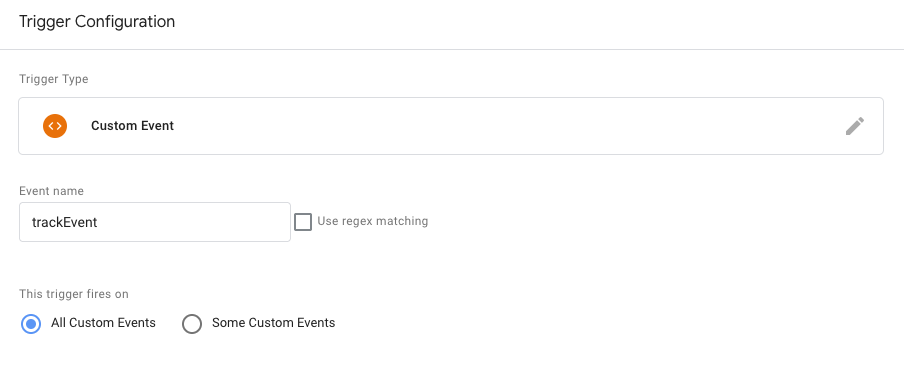
Choose Custom Event, then type trackEvent for the event name field. Last, you will want to name your trigger to something you can reference in the next step. This completes the trigger setup.
Creating the Event Tag
Next, you will need to create a new Tag from the left menu. Choose Google Analytics: Universal Analytics as we did previously.
Once you get to "Track Type", choose "Event" instead this time. Below is what the event Track Type setup should look like.
You can manually type in the variables as I have them listed. Make sure to select your GA variable previously created.
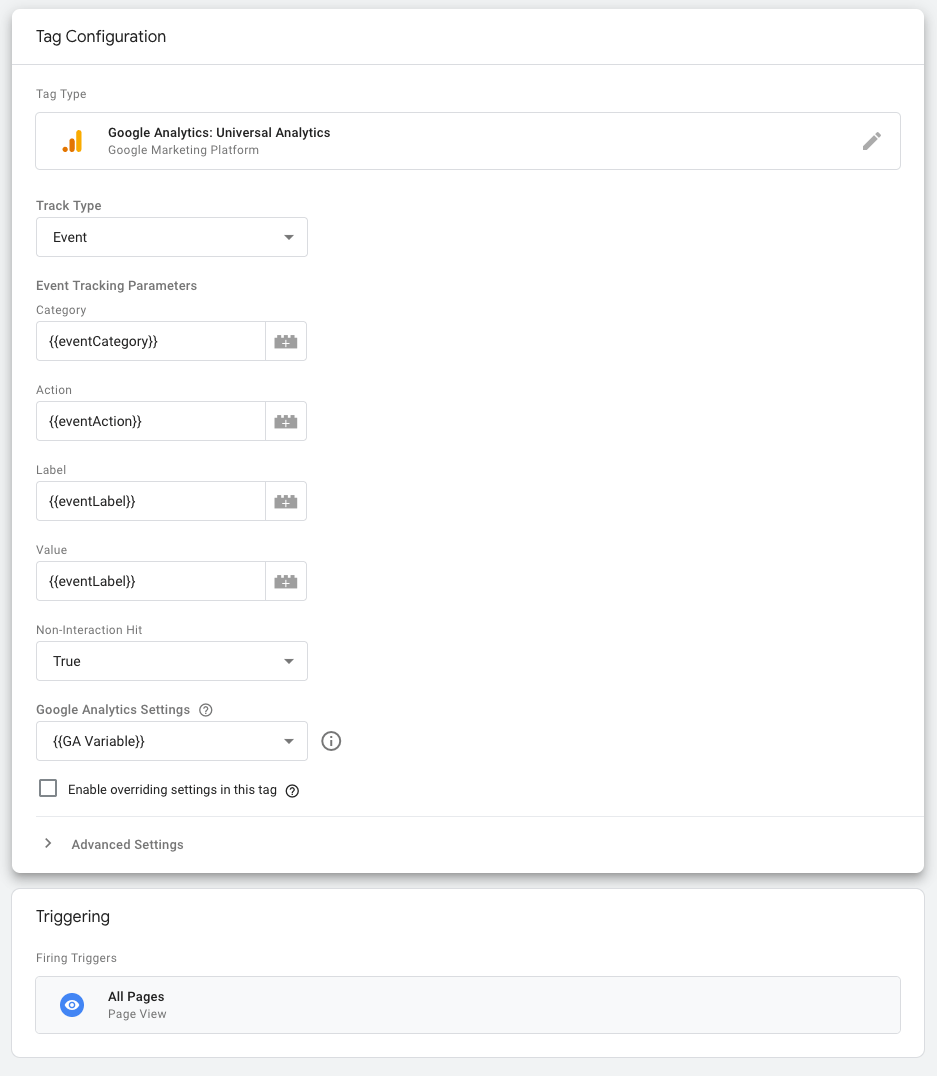
Let me briefly discuss what everything after Track Type means. First, we have four event tracking parameters. These are variables that can be named anything you want within the curly braces. I'm choosing names that will be easy to implement later on any website.
The Non-Interaction Hit can be set to true or false. It comes down to whether this click will take the user to a new page within your site. If yes, we would set this tag parameter to false.
However, most event tracking will take place on some other type of object. The object might be a click to some type of download, an AJAX request, or even tracking the outbound clicks to your social media sites. Therefore, this is set to true.
We will also need a "trigger" for this tag and is typically set to All Pages again.
Once you have this configured based on your needs, click continue. In the next step, it will ask you to choose a trigger to fire on.
Make sure you give your new tag a title, such as Event Tracking.
Event Tracking Website Integration
Here's where everything comes together, and we actually start tracking the "events". The previous step to set up the event tag is how the user behavior will interact with the dataLayer and collect our array data.
I'll use the previous mention of collecting "clicks" for our social pages since most sites have their social media buttons in the website footer. Our site does as well, and 2 snippets of code are here:
<a onclick="dataLayer.push({ 'event' : 'trackEvent', 'eventCategory' : 'Social', 'eventAction' : 'Footer', 'eventLabel' : 'Facebook' });">Facebook</a>

<a onclick="dataLayer.push({ 'event' : 'trackEvent', 'eventCategory' : 'Social', 'eventAction' : 'Footer', 'eventLabel' : 'Twitter' });">Twitter</a>
It should be pretty obvious that you will be adding the onClick event to your links. Let's review what is going on with the rest.
First, we are "pushing" new data into our dataLayer array. Google Analytics will understand the event variable and "fire on" the trigger we created above using the trackEvent value.
Next, we have our custom variables that were created in the step above. I like to use eventCategory as a high-level grouping, then eventAction as a sub-group. I always use eventLabel to differentiate items within the group. However, the action could be "click" or another high-level grouping that makes sense with your specific strategy.
I left off using eventValue for this example, as I'm not interested in assigning value at this type. If you're tracking customer acquisition costs for a particular behavior, this value is something you might want to consider using.
Once you have everything set up properly, you can open up Google Analytics and go to Behavior → Events → Overview to see the data being collected.
If your site's traffic is low, this might take some time. Keep in mind that GA is always about a day behind with providing data.
However, you can also test your tag directly in GTM to see if everything is working correctly.
Conclusion
Google Tag Manager is a great way to organize all of your website tracking codes. You can add Facebook pixels for retargeting, AdWords conversion tracking pixels, and so much more.
Give it a try and definitely let me know if I left anything off that might help this guide. My goal was to keep this guide short and simple to follow, and hope it helps you set up event tracking quickly.
